Baby Craft: Egg Shakers

I really debated about whether I should post this craft or not.  It’s already pretty well known, and it’s so simple to do that I feel kind of silly posting instructions for it.  However, I’m just a little bit of a perfectionist, and I like the idea of posting about all of my baby crafts, so here we go…

EGG SHAKERS

Egg Shakers

Supplies Needed:
–  Plastic Easter eggs
–  Uncooked rice (or popcorn kernels)
–  Tape (or hot glue gun)

Directions:
–  Open Easter egg
–  Pour in a little bit of rice or popcorn kernels
–  Tape or glue shut

About This Craft:

I really don’t have too much to say about this craft.  It’s pretty simple, and it’s a great way to use up Easter eggs after the holiday.  I use egg shakers a lot in my toddler (and sometimes preschool) storytimes.  We shake them up high, down low, and to the beat of music.  With babies, it’s just nice to watch them play with the egg shakers.

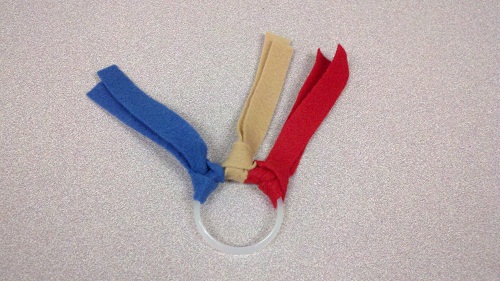
Baby Craft: Felt Ribbon Ring

I have to say a huge thank you to Melissa at Mel’s Desk for coming up with this one!  Thinking of baby crafts can be a bit tricky, especially if you’re like me and want some variety and don’t want to paint baby’s foot/hand every week!  (Don’t get me wrong, the painting baby’s foot/hand crafts are adorable, and I do my fair share of them but, like I said, I like variety.)  This craft has the triple benefit of being cheap, easy, and fun for babies to play with!

FELT RIBBON RING

Felt Ribbon Ring

Supplies Needed:
–  Plastic shower curtain rings
–  Felt in various colors cut into thin strips

Directions:
–  I’m going to point you over to Mel’s Desk for the directions because she has great, easy-understand instructions with pictures!  She also suggests ways to use the felt ribbon rings with babies and toddlers!

Note:

I pre-cut the felt and just place the various colored strips on the table in a pile for the caregivers to pick and choose.  This not only saves time, but it also means that the caregivers don’t have to use scissors while holding babies.

Baby Craft: Rhyme Cube!

My baby storytimes have started back up, which means I have some new baby-appropriate crafts to share with you!

This first craft is something that I initially made to use in my Pre-K storytime.  I decided that I wanted to sing more in that storytime (and have the kids and their caregivers sing along), but coming up with songs off of the top of my head on the spur of the moment is hard!  So I made this rhyme cube, and it has been a big success in Pre-K storytime.  It’s a lifesaver for me (especially on days when I need to get the kids’ attention or fill up some time due to a particularly short book).  However, it’s also a favorite among the kids!

Since the rhyme cube has been such a big hit with the older kids, I figured it would make a great craft for the baby storytime.  Surely I’m not the only one who has trouble thinking of rhymes off of the top of my head, and this way parents can take it home and be reminded to sing rhymes with their babies.

RHYME CUBE

rhyme cube

Supplies Needed:
–  Tissue box (I prefer empty, but you can use a full one if you want)
–  Clip art for rhymes
–  Colored paper (optional)
–  Book tape

Directions:
–  Tape rhyme clip art to larger squares of colored paper (optional, but it looks nice)
–  Tape rhyme clip art to each side of tissue box
–  Place book tape over rhyme clip art to create a laminated effect (also helps protect it)

About This Craft:

This is a cheap craft, although you’ll have to remember to save up tissue boxes ahead of time (I started saving in the fall for this spring craft).  While it’s a fairly simple craft to do, it can be time-consuming.  Out of the six caregivers who came to today’s session, only three completed the craft, and it took them about 20 minutes to do it.  Out of the other three, two attempted the craft but gave up when their babies started reaching for the paper (they ended up taking the supplies home to do it later), and one didn’t attempt it at all.  To make the craft shorter, you can skip the colored square backgrounds and even the book tape.

Note:

Some people suggest using full tissue boxes (either leave the tissues in them, or fill them with something else).  This will make them more sturdy.  However, I have found that empty tissue boxes roll better.  So it’s my own personal preference to use empty ones.

Baby Craft: Bib Clip!

When it comes to baby crafts, I look for things that are either: 1) a fun, early literacy toy that baby can play with, 2) a piece of artwork that caregivers can keep in a scrapbook or send to grandma/grandpa, or 3) something useful for the caregivers.  This particular craft is something useful for caregivers.  Using ribbon, Velcro, and small binder clips, this bib clip is for when caregivers are out with baby and forgot to pack a bib.  All they need to do is clip a napkin or towel and voila!  It’s a make-shift bib.  (I like to joke that it also works on messy husbands and teenagers.)

BIB CLIP

Bib ClipSupplies Needed:
–  Ribbon
–  Small, colorful binder clips
–  Velcro
–  Scissors

Directions:
–  Cut ribbon to desired length
–  Loop small binder clips through ends of ribbon
–  Secure with Velcro

About This Craft:

As I said before, this is something cute and easy to make that caregivers can keep in their diaper bags for those times when they need a bib and don’t have one available.  I’ve had several people, including coworkers, tell me how much they liked this craft.  And it’s so simple and cheap to make that I will definitely be using it again.

Note:

I used Velcro because it was the easiest for our crafting situation.  Seeing as Velcro can be pulled apart, hot glue or sewing the ends shut might be more secure options.  However, with a lot of parents and babies in the room, it’s always best to go with the easiest option for these baby crafts.  Parents are welcome to alter it at home if they want.

Baby Craft: Button Snake!

This was the first time that I tried this craft for Babygarten.  I found it on Pinterest and decided that it could definitely work even though the finished product is more suited for toddlers (or even preschoolers).  The very young babies can’t do much with it, but I figured that this is something that the caregivers can hold onto until their children are developmentally ready for it.

BUTTON SNAKE

button snakeSupplies Needed:
–  Ribbon (not the curling kind)
–  Button (big enough to be a stopper at the end)
–  Thick thread (friendship bracelet thread)
–  Needle
–  Assorted felt
–  Scissors

Directions:
–  Pre-cut ribbon to desired length
–  Sew button on one end of ribbon
–  Cut various shapes out of felt
–  Cut slit in middle of felt shapes
–  Have child practice pulling the ribbon through the felt

About This Craft:

This craft makes a fun toy that helps young children develop hand-eye coordination and fine motor skills by weaving the ribbon through the shapes.  It’s also a good toy to use to teach shapes, colors and patterns!  Like I said earlier, it’s really meant for older children, but I don’t think anyone cared that they had to hold onto it for awhile before their children could play with it.  A few caregivers told me that they really liked it.

Note:

Some caregivers might be nervous about sewing buttons.  So I sewed buttons onto some ribbons before the program started so that those who are uncomfortable learning to sew wouldn’t have to.  This worked out well because a lot of the caregivers like to bring their kids to the table while they work on their craft, and I think sewing with small children around would have been too difficult.  I did have some ribbon, buttons and needles available just in case though.

Also, even though most of the babies were still a little young for this one, they all enjoyed playing with it anyway.  One baby, however, liked to chew on the button, so I had to tell the caregivers to keep an eye their babies if they were going to play with this toy.  I sewed the buttons on good and tight, but I don’t want a baby chewing it off and choking.  (The other babies, oddly enough, did not even think about putting it in their mouths.)

Like I said earlier, the caregivers really liked this one.  But the possible choking hazard is causing me to consider keeping it for older kids and taking it out of the Babygarten craft list.

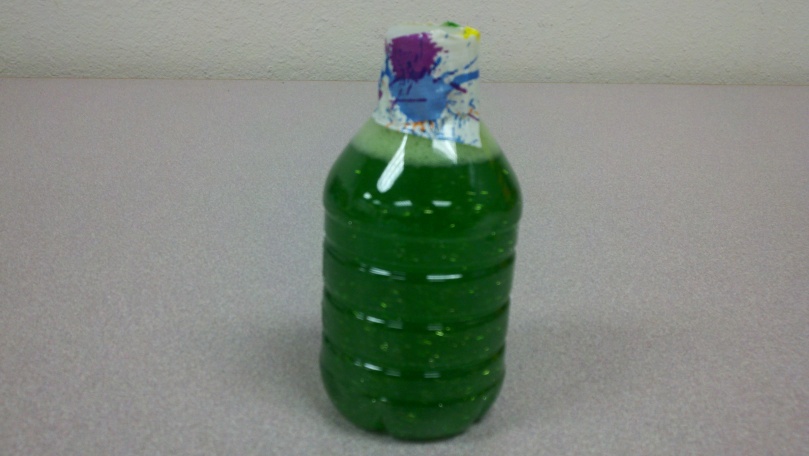
Baby Craft: Calming Glitter Bottle!

Another easy sensory craft for babies involves water bottles, water, food coloring and whatever you want to put in the bottle that’s pretty for baby to look at.  I have two versions of this craft:  For my winter session, I put glitter in the bottle, and for my fall session, I put larger items (such as pom-poms, sequins, beads, googly eyes, buttons, etc) into the bottle.

CALMING GLITTER BOTTLE

calming glitter bottle

Supplies Needed:
–  Clear, plastic water bottles (I use the tiny ones)
–  Water
–  Food coloring
–  Loose glitter/glitter glue
–  Masking tape

Directions:
–  Fill bottle with water
–  Add desired amount of glitter
–  Add food coloring
–  Put lid back on and wrap masking tape around it
–  Shake bottle to create glitter storm

About This Craft:

For babies, this craft is all about the sensory experience and the fine motor skills.  Babies enjoy looking at the sparkling glitter, and it gives them practice holding and manipulating the bottle to strengthen their hand muscles.  When the babies get older, these bottles (or bigger versions of these bottles) can be used as time out timers.  The glitter settling to the bottom of the bottle supposedly has a calming effect on children.

Note:

I use silver glitter glue for this craft.  I have a big bottle of it, and I just squirt a little into the water bottles.  This helps me avoid messes with loose glitter.  If you do decide to use loose glitter instead of glitter glue, you might want to use a funnel to keep things tidy.  Also, make sure you use very fine glitter as opposed to larger, clumpier glitter.  Technically the larger glitter still works, but it’s less calming and more razzle dazzle and, instead of settling to the bottom, half of the larger glitter tends to clump to the top.

Baby Craft: Sensory Bags!

When I was a kid, I was a bit of a worrier.  I’m happy to say that I’ve mostly overcome that particular trait.  It’s actually pretty impressive how I’m able to keep a clear head in stressful situations these days.  However, when it came to some of these baby crafts, I initially worried about them.  Would we make a huge, paint-splattered mess if we paint baby’s foot?  Would the sensory bottles be too heavy for babies to play with?  Would health-conscious moms scoff at having their babies fingerpaint with chocolate syrup?

My worrying was always for naught because the answer to all of those questions ended up being a big, resounding no.  (Okay, there’s a little paint stain in the sink from washing the babies’ feet, but you can hardly tell!)  My big worry with this craft was that the Ziplock bag would puncture and aloe vera would get all over baby.  As far as I know, this hasn’t happened.  Ziplock bags are pretty resilient (especially when they’re reinforced with masking tape).  However, I still warn the caregivers to supervise when baby plays with this particular toy.  You know.  Just in case.

BABY SENSORY BAGS

Sensory Bag 2

Supplies Needed:
–  Quart sized freezer Ziplock bag
–  Masking tape
–  Scissors (for cutting tape)
–  Aloe vera (preferably green or blue, but clear works too)
–  Buttons, beads, etc.

Directions:
–  Reinforce the three non-zipper sides of the bag with masking tape
–  Place a small handful of buttons/beads/whatever into bag
–  Squeeze desired amount of aloe vera into bag
–  Zip closed
–  Reinforce zipper side of the bag with masking tape
–  Squish

About This Craft:

Sensory stuff seems to be all the rage in the mommy blogs these days, and this is a fun and mostly safe one for babies.  Just as long as baby doesn’t puncture the bag with a fork or something.  It’s an easy enough craft for a group to do; however, reinforcing the bags with tape can be a bit time-consuming, so it might be beneficial to have some tape pre-cut.  (I went ahead and reinforced 3 sides of several bags so that the caregivers only had to reinforce the one side after they were done.)  This one is a huge hit with both babies and caregivers!  A few of the adults told me that they have just as much fun playing with it as their child does!

Note:

One thing about baby crafts is that they tend to require supplies that you may not already have in your libraries.  Like baby socks.  And aloe vera.  My library did have the freezer bags and buttons/beads and masking tape; however, I had to go out and buy several bottles of aloe vera.  I found decent sized bottles of blue aloe vera at Wal-Mart for about $4 a bottle.  We ended up using about a half a bottle for each craft.

Baby Craft: Gripper Socks!

The baby storytime that I do at my library is an hour long and includes a craft.  Now, when I first learned that I needed to do a craft for a baby storytime, I had my doubts about it:  Would the grown-up caregivers feel comfortable doing a craft?  Are there any crafts out there that are suitable for babies?  Would this create a huge mess in our activity room?

I admit that I was very nervous about these baby storytime crafts, and they did give me a few headaches over the years as I tried to figure out what works and what doesn’t.  However, I’ve found that these crafts are a huge hit with caregivers!  Over the past two years, I’ve spent ages searching Pinterest for appropriate crafts, and I thought I’d post them here for easy access if anyone else wants to start a craft portion for their baby storytimes.  (Or a baby craft program unto itself.)

This week, we made…

GRIPPER SOCKS

socksSupplies Needed:
–  Baby Socks (size 18-36 months; little ones can grow into them)
–  Puffy Paint in various colors
–  Cardboard cut into small rectangles

Directions:
–  Insert cardboard rectangles into socks (makes them sturdy)
–  Decorate the bottom of the sock with Puffy Paint
–  Let dry (I give the caregivers the option of leaving their socks at the library until next time)
–  Take out cardboard

About the Craft:

I love to use this craft for our first baby storytime of the winter session because it’s super simple, yet very cute.  Some caregivers are initially nervous about the craft portion of the baby storytime, so offering a craft that’s very easy is a way to reassure them that they do not need to be an artist to make a craft with their children.  Normally this craft is a huge hit with caregivers; however, only a quarter of the caregivers who came to today’s storytime partook in the craft.  The rest decided to stay on the storytime carpet and socialize, which is perfectly acceptable.  Those who did do the craft loved it, though.

Note:

While we do our craft, we have music playing and toys on the storytime carpet for the babies to play with.  Some mothers will take their babies with them to work on the craft, others ask a nearby mother to watch her baby play while they do the craft independently.  Both work (though having a baby in your lap while you craft can be a bit tricky).